


Technical Knowledge · Metallography · Quality Control · Sample Preparation
Metallographic Grinding & Polishing Machines in Industrial Quality Control: A Technical Deep-Dive and Practical Playbook
In industrial materials quality control, metallographic results are only as reliable as the specimen preparation behind them. A stable grinding and polishing process—controlled speed, consistent pressure, clean consumables, and repeatable steps—reduces rework, improves lab throughput, and protects the integrity of microstructural conclusions.
Why Metallographic Preparation Is a “Hidden Variable” in Quality Control
In sectors such as automotive, aerospace, energy, tooling, and electronics, metallography supports decisions that can affect yield, safety margins, and supplier qualification. Yet many lab teams underestimate how strongly preparation variability influences outcomes—especially when multiple technicians or shifts handle the same material family.
Field observations across routine QC labs show that 30–45% of repeat metallography work can be traced back to preparation issues: residual deformation, embedded abrasive particles, edge rounding, or cross-contamination between grinding stages. The cost is not only time—incorrect phase interpretation or missed defects can lead to wrong root-cause conclusions, delayed releases, and inconsistent inspection records.
QC Reality Check: What “Good Preparation” Looks Like
- Uniform scratch pattern per stage, fully removed before moving forward
- Minimal edge rounding, especially on multi-phase alloys and coated materials
- No pull-out, smearing, or embedded abrasives that mask true microstructure
- Clean, documented consumable sequence enabling repeatability across operators

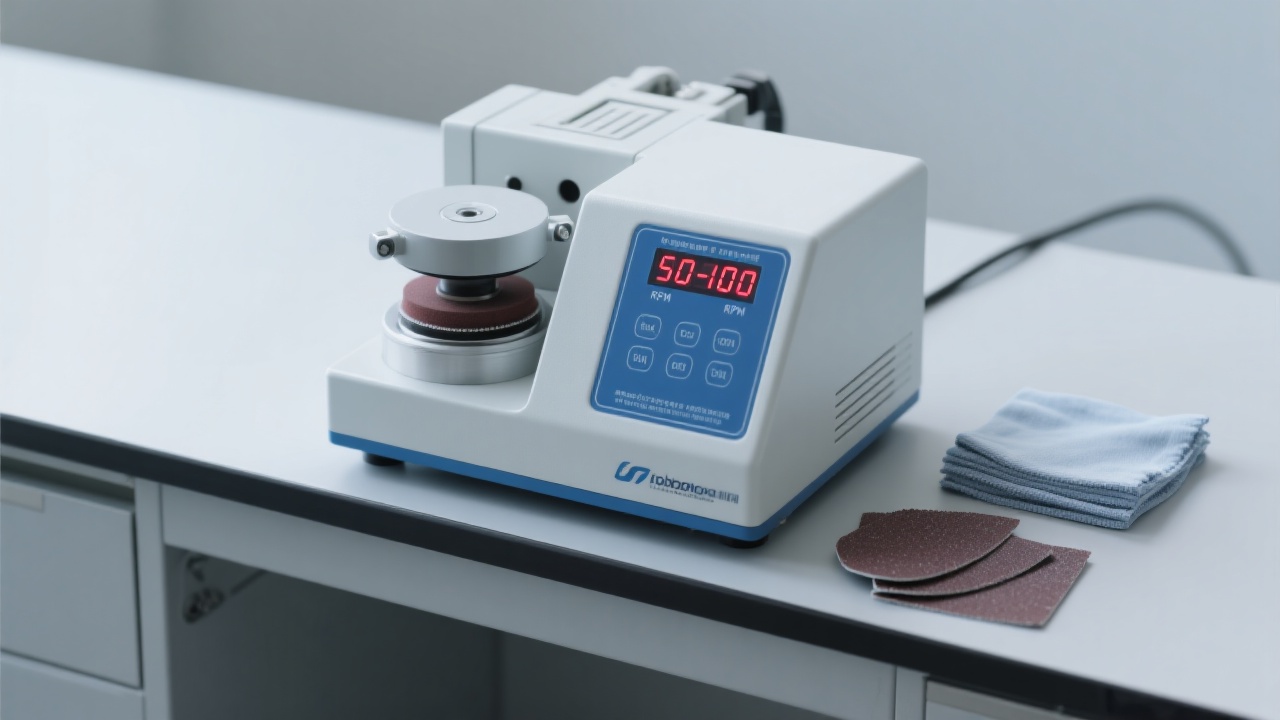
MP-1B Metallographic Grinding & Polishing Machine: Technical Features That Support Standardization
The MP-1B is designed for repeatable specimen preparation in production-oriented labs. Instead of treating grinding and polishing as “artisan” work, it emphasizes controlled parameters—speed, contact stability, and consistent disc performance—so results remain comparable across lots, shifts, and technicians.
50–1000 rpm Stepless Speed Control: Matching Surface Response to Material Behavior
Different materials respond differently to the same surface speed. Ductile metals (e.g., aluminum alloys) can smear at excessive speeds, while hard steels may require optimized energy input to remove deformation efficiently. Stepless control from 50 to 1000 rpm helps technicians tune removal rate and heat generation without being locked into coarse speed steps.
In practical QC workflows, labs often see 10–25% faster cycle time once speed is optimized per material family (e.g., low-alloy steel vs. stainless vs. copper alloys), because fewer “extra passes” are required to eliminate deep scratches from earlier stages.
Integrated 3-in-1 Design: Reducing Handling Errors and Process Drift
A unified grinding/polishing setup minimizes the number of transfers, which is a common source of contamination and accidental damage (chips, edge rolling, debris re-attachment). A stable workstation layout also supports repeatable SOPs—a critical factor when the lab’s output must be auditable.
Precision Polishing Disc Flatness: Consistency Across the Entire Specimen Face
Disc flatness and structural rigidity influence how evenly the specimen contacts abrasives. When flatness is inconsistent, technicians compensate by increasing force or time—often increasing deformation or rounding. A precision disc surface supports consistent material removal, particularly important for thin sections, coated samples, and multi-phase alloys where edge integrity matters.
Specification Snapshot (Typical QC Use)
| Parameter | Recommended QC Target | Impact on Results |
|---|---|---|
| Speed control | 50–1000 rpm, stepless adjustment | Balances removal rate vs. smearing/heat |
| Preparation repeatability | Stable stage-to-stage scratch removal | Reduces rework, improves comparability |
| Surface quality goal | Mirror finish before etching (material-dependent) | Improves phase boundary clarity and defect visibility |
| Typical per-sample prep time | 6–15 minutes (common metals) | Higher throughput for routine QC lots |
Note: Actual time depends on hardness, mounting quality, starting condition, and consumables.
Standard-Compliant Operation: How to Reduce Scratches and Contamination in Real Lab Conditions
International guidance such as ASTM E3 (preparation of metallographic specimens) and ISO 14677 (metallographic preparation of metallic materials) consistently emphasizes repeatability: controlled removal of deformation, progressive abrasive sequence, cleanliness, and prevention of cross-contamination.
Standards takeaway (ASTM E3 / ISO 14677): Preparation should remove damage from prior operations without introducing new artifacts; abrasive steps must be progressive, and specimen/consumables must be kept clean to prevent foreign particle embedding and misleading indications.
Practical Operating Rules That Prevent 80% of Common Defects
- One direction per stage, rotate between stages: Grind in one direction, then rotate the specimen ~90° when moving to the next grit. If previous scratches remain, they will “stand out” immediately.
- Never skip grit sizes on damaged samples: Skipping may look faster but often increases total time due to persistent deep scratches. A controlled sequence typically reduces total rework.
- Use disciplined cleaning: Rinse specimen and holder thoroughly, then wipe with lint-free tissue. Cross-contamination is a frequent cause of random deep scratches that “appear out of nowhere.”
- Control heat and lubrication: Excess heat can smear soft metals and create false structures. Adequate coolant/water and appropriate load reduce thermal artifacts.
- Protect edges: For critical edge evaluation, ensure good mounting support and avoid excessive pressure; edge rounding can hide decarburization, coating thickness variation, or microcracks.
Infographic: A Repeatable Preparation Flow (Example for Common Steels)
Sample ID, orientation, and acceptance criteria defined before material removal begins.
Remove saw damage; keep flatness. Avoid over-grinding edges.
Progressive grits; confirm full scratch replacement before moving on.
Use appropriate cloth/abrasive; manage lubrication to prevent smearing.
Aim for a uniform, mirror-like finish; avoid contamination from previous grit.
Etch based on material; verify microstructure without preparation artifacts.
Suggested Parameter Windows (Starting Point, Then Refine)
Labs often need a “safe baseline” for new technicians. The ranges below are common starting points for manual preparation; they should be validated against internal acceptance criteria and material specifications.
| Stage | Typical Consumable | Speed (rpm) | Time (sec) | Key Control Point |
|---|---|---|---|---|
| Coarse grind | SiC paper 240–320 | 200–350 | 30–90 | Remove saw marks; keep specimen flat |
| Fine grind | SiC paper 600–1200 | 150–300 | 30–120 | Verify full scratch replacement before moving on |
| Pre-polish | Diamond 6–3 µm cloth | 120–250 | 60–180 | Avoid dragging debris; keep cloth conditioned |
| Final polish | Diamond 1 µm or colloidal silica | 80–180 | 60–240 | Minimize relief; prevent contamination |
Reference values commonly used in industrial labs; validate against your materials, hardness, and microscope requirements.
Deployment Playbook: Installation, Training, and Remote Support That Keep QC Running
For quality control teams, a metallographic grinding and polishing machine is not “just equipment”—it is a dependency in the inspection chain. Downtime interrupts lot release, supplier evaluation, and failure analysis, so deployment should be treated like a process launch.
On-Site Installation: The Small Checks That Prevent Week-One Instability
- Bench stability and level verification to protect disc flatness and operator control
- Electrical and safety checks aligned to local lab requirements
- Water/coolant management setup to reduce heat artifacts and residue buildup
- Consumable mapping: label and separate grits/cloths to reduce cross-contamination
Technician Training: From “How to Use” to “How to Control Variation”
Effective training focuses on identifying preparation artifacts and linking them to controllable variables. Many labs improve consistency quickly by adopting a simple checklist approach: stage, consumable, speed, time, cleaning, acceptance check. After two weeks of standardized practice, teams commonly report 20–35% fewer rejected specimens caused by scratches or contamination.
Remote Support & Spare Parts: What Sustains Long-Term Repeatability
In global manufacturing, remote troubleshooting is often the fastest path to restoring inspection flow. A support model that includes quick diagnostics, operator video guidance, and consumable/spare availability reduces unplanned downtime and protects the lab’s KPIs.
- Remote parameter review: speed/time/sequence tuning for new materials or failure analysis work
- Consumable compatibility guidance: cloth and abrasive selection to reduce relief or smearing
- Spare parts readiness: planned replacement of wear items to avoid performance drift
Turn Preparation into a Controlled Process—Not a Bottleneck
When metallographic preparation is standardized, inspection becomes faster and conclusions become more defensible. If your lab is trying to reduce rework, stabilize results across shifts, or align with ASTM/ISO expectations, the right grinding and polishing platform is a measurable advantage.
What QC teams typically ask for
- Baseline method for steels, stainless, aluminum, copper alloys
- Artifact troubleshooting: smearing, pull-out, deep random scratches
- Training checklist for consistent results across operators


Hardness-TesterHV-5103050A-1.jpg?x-oss-process=image/resize,h_1200,m_lfit/format,webp)


